Does the thought of another craft project involving pipe cleaners, paper plates or foam shapes make you cringe? Give yourself, the environment and the folks on your gift list a break: try one of the following eco-friendly crafts that your children can make and give. The projects use almost entirely natural materials and are truly a joy to craft and to receive.
Are your kids itching to get in the kitchen? Head over to our first Gifts Kids Can Make post for tutorials on edible gifts for the foodies on your kids' lists!

Feather Hair Pins or Magnets
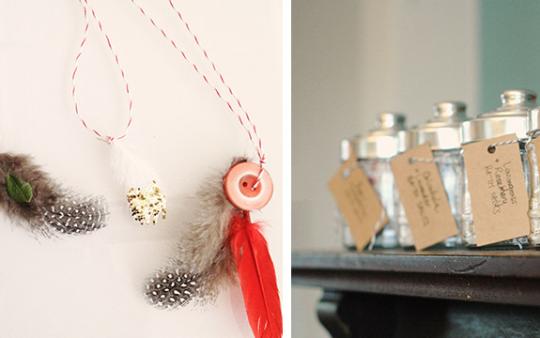
Great for nature lovers, these hair pins can also be reworked a bit to become fridge magnets for recipients who wouldn’t be over the moon about hair pins. Using a hot glue gun, glue on the feathers, followed by buttons. Also consider subbing in some small pieces of bark or branches for the buttons for an even more natural look. For such a simple craft, these are very striking.
Materials
- feathers, found or purchased
- buttons or other adornments
- hot glue gun & glue
- bobby pins

Herbal Bath Salts
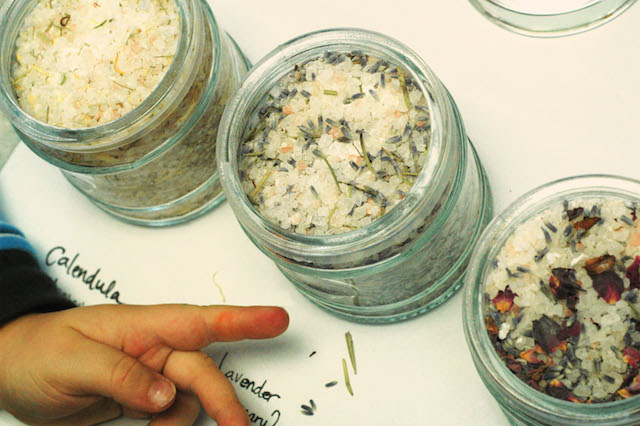
Crafting these gifts from the earth offers the perfect antidote to a hectic or overwhelming day, thanks to the wonderful aromas of the herbs. The kids can fill the jars three quarters full, leaving enough room to add herbs and mix them in. Add a tag and ribbon – you’re done.
Materials
- mineral salts or epsom salts
- baking soda (2 tbsp per cup of salts)
- dried herbs of your choice (2 tbsp per cup of salts)
- bowls
- wooden spoon
- glass jars & lids
- twine, ribbon, tags, pens, etc.

Holiday Ornaments
Great for gifting to grandparents or friends, these ornaments are fun and simple to make, and a nature-inspired twist on traditional crafty ornaments for kids. We do love making the more common salt-dough ornaments as well, and they are definitely a lovely group craft for the holidays.
Materials
- feathers, found or purchased
- buttons or other adornments
- white glue
- hot glue gun & glue
- festive string
- glitter

Acorn Cap Floating Candles
Come on. What’s cuter than these? Sure, they only burn for minutes, but they are heart-warming, adorable minutes. If you have a lot of beeswax, you can also fill some small mason jars for gifting. Kids can help out by collecting acorn caps, checking them for holes, cutting the wick – and the best fun – smashing the beeswax! Depending on age (and temperament), they can also help scoop the beeswax into the caps.
Materials
- beeswax – check with your local apiarist who may have some on hand
- candle wick
- round wick tabs
- double boiler
- play dough or clay
- tray or something else to catch drips
- pliers
Instructions
- If you have a large block of beeswax, try freezing it overnight, and then smashing it into pieces, rather than trying to grate or chisel away at it.
- Melt the beeswax in a double-boiler.
- Hold the wick in an empty acorn cap to determine where to cut it, allowing extra just in case.
- Settle the empty caps into some play dough or clay to stabilize them.
- Place the wick into the acorn cap. Using the pliers, tongs or whatever you can scare up, hold the wick steady in the centre while you scoop the melted beeswax into the acorn cap, until full. The wax might shrink a bit when it dries, so don’t be shy.
Revised steps for larger candles:
3. Thread the wick through the round wick tab and use pliers to clamp the tab tight around the wick. Acorn caps are too small for these tabs.
5. Use a pencil or clothes pin to hold the wick up in the centre of the jar as you pour in the hot wax.

Homemade Play Dough
We all know that play dough is fun to play with. Did you know how much fun it is to make? A few ingredients, a bit (okay, a lot) of elbow grease, and you’ll have awesome homemade play dough without all of the nasty ingredients found in the commercial alternative. Great for gifting to little pals.
Ingredients
- 1 cup organic flour (see below for gluten free modifications)
- 1 cup warm water
- 1/2 cup sea salt
- 2 tablespoons cream of tartar
- 2 tablespoons oil
- natural dye if desired (we have tried India tree, as well as homemade dyes)
- optional scent, such as:
- With red dye: holiday cheer spices like allspice and clove, or peppermint essential oil
- With green dye: mint essential oil
- With purple or pink dye: lavender essential oil
- With yellow or orange dye: lemon or orange essential oil
Instructions
- If you’re using a dye, mix it into the water.
- Place all ingredients into a large pot on the stove (excluding essential oils).
- Heat on medium-low.
- Stir, stir, stir! Work those arms until the dough forms a ball.
- Take the pot off of the heat and let the mixture cool a bit.
- Take the dough from the pot and knead it on a floured surface (if at all sticky) until it is the desired texture. The kids love this part. This is also where you’ll add in any essential oils.
- Package it up in a mason jar or tin for a super fun gift! Our dough, unused, has often lasted a year. Once it starts getting used, it lasts months rather than a year, as it gets dried out and, well, kinda rough looking!


